
Foreword
Safety instructions
Revision history
Privacy Notice
About this guide
Precautions and warnings
Operational requirements
Installation requirements
Introduction
Overview
Technical Specifications
Package contents
Design
Appearance
Function buttons
Adding the key fob to the hub
Key fob configuration
Status display
Custom configuration
Using the key fob
Battery replacement
Maintenance
Disposal
Warranty
Wireless key fob (remote control)
SAFE Key Control (SAFE 38030)

Foreword
General
This user manual describes the installation, functions and operation of the wireless key fob (hereinafter referred to as the "key fob"). Read the manual carefully before using the device and keep it for future reference.
Safety instructions
The following signal words may appear in the user manual:
| Signal word | Meaning |
|---|---|
| DANGER | Indicates a high potential risk which may result in death or serious injury if not avoided. |
| WARNING | Indicates a medium or low potential hazard which could cause minor or moderate injury if not avoided. |
| NOTICE | Indicates a potential hazard that could result in property damage, data loss, reduced performance, or an unpredictable result. |
| TIP | It provides methods to help you solve a problem or save time. |
| NOTE | It provides additional information, such as highlighting and adding to the text. |
Revision history
| Version | Revision content | Date of publication |
|---|---|---|
| V1.1.2 | Battery description added. | August 2023 |
| V1.1.1 | Battery life revised. | June 2023 |
| V1.1.0 | • Technical specifications added • Parameter descriptions updated. • Images updated. | February 2022 |
| V1.0.0 | First edition | October 2021 |
Privacy Notice
About this guide
- This user guide is intended for reference purposes only. There may be minor differences between the information provided and the product itself.
- We accept no liability for damage resulting from the use of the product in a manner that does not comply with the instructions in the user manual.
- This guide will be updated in line with the latest laws and regulations in the relevant jurisdictions. Detailed information can be found in the printed user guide, by scanning the QR code, or on our official website. This guide is for reference purposes only. There may be minor differences between the electronic and printed versions.
- All designs and software are subject to change without prior written notice. Due to product updates, there may be some discrepancies between the product and the information in this manual. Please contact customer services for the latest version of the software and supplementary documentation.
- Errors or discrepancies may occur in the description of functions, operations and technical data in this document. In the event of any doubt or dispute, we reserve the right to provide the final interpretation. If you are unable to open the manual (in PDF format), please update your PDF reader software or try another standard PDF reader.
- All trade marks, registered trade marks and company names in this handbook are the property of their respective owners.
- If you encounter any problems whilst using the device, please visit our website, contact your supplier or customer services.
- In the event of any ambiguity or dispute, we reserve the right to provide a definitive explanation.
Important safety precautions and warnings
This section contains information on the correct handling of the key fob, risk prevention and prevention of damage to property. Read it carefully before using the key fob and follow the instructions given when using it.
Operational requirements
⚠ NOTICE
- Before use, please ensure that the device’s power supply is working correctly.
- Do not unplug the device’s power cable whilst it is switched on.
- Only use the equipment within its rated power range.
- Transport, use and store the device within the permitted humidity and temperature ranges.
- Prevent liquids from splashing or dripping onto the device. Ensure that there are no objects containing liquid on the device to prevent liquids from entering it.
- Do not dismantle the device.
⚠ WARNING
- Connect the device to the power adapter before turning it on.
- Strictly comply with local electrical safety standards and ensure that the voltage in the area is stable and meets the device’s power supply requirements.
- Do not connect the device to more than one power source. Doing so may damage the device.
⚠ NOTICE
- When working at height, follow all safety procedures and use the required personal protective equipment made available to you.
- Do not expose the device to direct sunlight or sources of heat.
- Do not install the device in damp, dusty or smoky areas.
- Install the appliance in a well-ventilated area and do not block the device's vent.
- Use the mains adapter or power supply provided by the device manufacturer.
- The power supply must comply with the ES1 requirements of the IEC 62368-1 standard and must not exceed PS2.
- Please note that the power supply requirements are as stated on the device’s label.
- Connect Class I electrical appliances to a socket with a protective earth.
Introduction
Overview
The Key Control wireless key fob is a miniature remote control that connects to the hub and controls your SAFE alarm system. The key fob has four buttons for easily setting the system arming mode, triggering an SOS alarm or controlling selected automation devices. Device operation is indicated by an LED indicator.
The key fob is part of the SAFE alarm system and is connected to the hub via the protected SafeKeeper protocol.
| Type | Parameter | Description |
|---|---|---|
| Interface | Indicator light | 1x two-colour LED status indicator (green: normal, red: abnormality) |
| Button | 4x (arming, partial arming, disarming, SOS / control) | |
| Remote Update | Yes (Cloud) | |
| Search | Signal strength detection | |
| Low battery notification | Yes | |
| Wireless Transmission | Carrier Frequency | 868.0 MHz – 868.6 MHz |
| Transmitter Power (EIRP) | Limit 25 mW | |
| Communication Distance | Up to 900 m (2,952.76 ft) in open space | |
| Communication Type | Bidirectional | |
| Encryption Mode | AES128 | |
| Frequency Hopping | Yes | |
| General | Power Supply | 1x CR123A battery (pre-installed) |
| Battery Voltage | 3 V DC | |
| Minimum voltage | 1.8 V DC | |
| Battery discharge threshold | 2.65 V DC | |
| Current Consumption | ≤ 3 μA (operation) / ≤ 50 mA (alarm) | |
| Power supply type | Type C | |
| Battery life | 3 years | |
| Power Consumption | Max. 100 mW | |
| Operating environment | –10 °C to +55 °C (+14 °F to +131 °F) (indoors) | |
| Operating Humidity | 10 % – 90 % (RH) | |
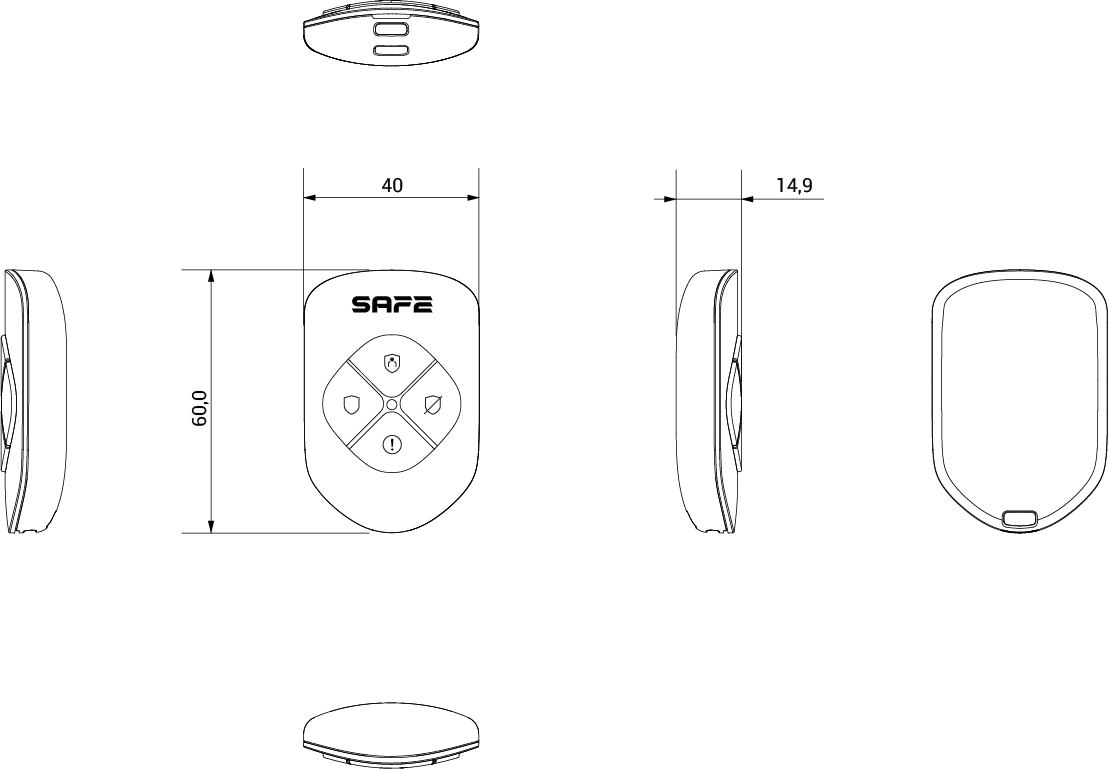
| Product Dimensions | 60.0 mm × 39.5 mm × 15.0 mm (2.36" × 1.56" × 0.59") (L × W × H) | |
| Package Dimensions | 135.0 mm × 98.5 mm × 27.8 mm (5.31" × 3.88" × 1.09") (L × W × H) | |
| Weight (net) | 20 g (0.04 lb) | |
| Weight (gross) | 65 g (0.14 lb) | |
| Compliance | CE EN 50131-1:2006 + A1:2009+ A2:2017 + A3:2020 EN 50131-6:2017 EN 50131-5-3:2017 EN 50131-2-6:2008 Security level 2 Environmental class II | |
| Housing Material | PC + ABS | |
| Colour | White | |
| Compatibility | Hub V1.001.0000000.4.R. 211014 or later; App V1.96 or later. |
Package contents





| Number | Item name | Amount of pcs. |
|---|---|---|
| 1. | Wireless key fob (remote control), CR2032 battery (pre-installed) | 1 |
| 2. | Lanyard | 1 |
| 3. | Quick User Guide | 1 |
| 4. | Legal and regulatory information | 1 |
| 5. | QR code with the user guide | 1 |
Design
Description

| Button | Name | Function description |
|---|---|---|
1. | Arming | Pressing the button fully arms the system. |
| 2. | Partial arming | Pressing the button partially arms the system (only selected peripherals). |
| 3. | LED Indicator | • Flashes green rapidly: Key fob in pairing mode. • Lit green continuously: Normal. • Lit red continuously: The key fob is offline. • First flashes green and then turns red: Connection to the hub failed. |
| 4. | Disarming | Pressing the button disarms the system. |
| 5. | SOS / control | Pressing the button sends an SOS signal to the alarm system / activates, deactivates or toggles the state of the selected peripheral (optional). |
Dimensions
Adding the key fob to the hub
Prerequisites
The device is configured using the PRO Safe app. Please ensure that you have installed the PRO Safe app, created an account and added the hub to the app. For details on adding the hub, please refer to the user manual for the relevant hub.
📖 NOTE:
• Make sure the hub has a stable internet connection.
• Make sure the hub is deactivated (system deactivated).
Further information
This user guide uses operations in iOS as examples.
Procedure:
Step 1. Go to the hub screen and tap Peripherals to add the key fob.
Step 2. Tap the “(+)” button to scan the device QR code and then tap Next.
Step 3. Once the key fob is found, tap Next.
Step 4. Follow the instructions in the app and press buttons 1 (Arming) and 4 (Disarming) on the device simultaneously.
Step 5. Wait for the pairing to complete.
Step 6. Customise the key fob name, select the area and tap Finish.
Key fob configuration
Viewing and editing general information about the key fob.
Status display
To view device status information, open the mobile app, go to the hub screen, select the key fob from the list of peripherals and go to the tab Overview.
| Parameter | Value | |
|---|---|---|
| Device number | Order of the device in the system (according to pairing with the hub). | |
| Bridging | Temporary device deactivation status. | |
| Permanent deactivation | Permanent device deactivation status. | |
| Battery status | Device battery charge status. | |
 | Fully charged | |
 | Sufficiently charged | |
 | Moderately charged | |
 | Insufficiently charged | |
 | Discharged | |
| Operating Mode | Current device operating mode. | |
| Connection via repeater | Use of a signal repeater for device communication with the hub. | |
| Device firmware version | Information about the current device firmware version. | |
Key fob configuration
To edit device parameters, open the mobile app, go to the hub screen, select the key fob from the list of peripherals and go to the Settings tab.
| Parameter | Description |
|---|---|
| Device | Viewing the name, type and serial number of the device. • Tapping the “>” symbol in the device name field allows the name to be edited. • Save the changes made by tapping the OK button in the upper right corner. |
| Area | Selection of the system area to which the device is assigned. • Select the desired area from the list, or create a new one by tapping the Add area button. • Save the changes made by tapping the OK button in the upper right corner. |
| Bridging | Temporary device deactivation for the duration of one system arming / disarming period. • Yes – Information will not be transmitted to the hub. • No – Information will be transmitted to the hub. • Save the changes made by tapping the OK button in the upper right corner. |
| Permanent deactivation | Permanent device deactivation regardless of the system status. • Yes – Information will not be transmitted to the hub. • No – Information will be transmitted to the hub. • Save the changes made by tapping the OK button in the upper right corner. |
| LED Indicator | Enabling / disabling the device LED indicator. • After deactivation, the device LED indicator will not signal alarms, faults and system status changes. |
| Control permissions | Selection of the areas the device is authorised to control. • All – the device controls all areas in the system. • Area – the device controls only one area (according to the Area setting above). |
| SOS button | Enabling / disabling the device SOS button. |
| Operating Mode | Selection of the SOS button operating mode (option available only if the SOS button is enabled). • SOS – Pressing the button triggers an SOS alarm. • Control – Pressing the button runs the selected automation scenario. • Save the changes made by tapping the OK button in the upper right corner. |
| Scenario setting | Selection of the automation scenario triggered by pressing the SOS button (option available only in Control operating mode). • Select the desired scenario from the list and use the switch to activate or deactivate it. • Tapping the Create scenario button starts the wizard for creating a new automation scenario. In the next step, select from the list the device (e.g. smart socket, relay) that will be controlled within the scenario and tap the Next button. Then name the scenario (save the change by tapping the Save button in the upper right corner) and select the desired action: o ON – switching the device on; o OFF – switching the device off; o Toggle state – toggles the current state of the device. NOTE: A device can be controlled within one scenario only. |
| Alarm indication by siren | Enabling / disabling the function of signalling a device alarm by the siren (option available only in SOS operating mode). |
| Alarm and video linkage | Enabling / disabling the function of linking the device alarm with the selected video channel (option available only in SOS operating mode). • If enabled, a video recording from the selected video channel is saved after an alarm is triggered by the device. |
| Video channel | Selection of the video channel for linking video with the device alarm (option available only if the Alarm and video linkage function is enabled). • Select the desired video channel from the list. • Save the changes made by tapping the Save button in the upper right corner. |
| User Guide | Searching in the device user manuals. |
| Firmware Update | Information about the current device firmware version. • If a new device firmware update is available, tapping the Update button and then pressing any button on the key fob will download and install it. NOTE: The device restarts during the update; some device functions may be unavailable until the update is completed. |
| Remove | Option to remove the device from the system (unpairing from the hub). TIP: To quickly remove a device from the system, go to the hub screen, tap the “⋅⋅⋅” button next to the required peripheral in the list of peripherals and select the Remove option. In the next step, confirm the removal by tapping the OK button. |
Using the key fob
The maximum connection distance between the key fob and the hub is 900 m (in open space without obstacles). This distance is reduced by walls, ceilings and any other objects obstructing radio signal transmission.
After pairing the device with the hub, you can operate the key fob.
- When prompted during the pairing process with the hub, press buttons 1 (Arm) and 4 (Disarm) on the device simultaneously.
- For arming of the system, press button 1 (Arm) on the device once; all peripherals in the given area will then be armed.
- If the function System integrity checkis enabled, press button 1 (Arm) on the device twice to arm the system.
- For partial arming of the system, press button 2 (Partial arming) on the device once; only the selected peripherals in the given area will then be armed.
- For disarming of the system, press button 4 (Disarm) on the device once; all peripherals in the given area will then be disarmed.
- To trigger an SOS alarm or to control the selected automation device, press button 5 (SOS) on the device once.
⚠ NOTICE:
The pre-installed battery provides up to 5 years of key fob operation under normal use (one arming and disarming of the alarm system per day) and under normal operating conditions. More frequent use may shorten the battery life. You can check the current capacity status of the power battery at any time in the ProSAFE app.
Battery replacement:
- If the battery is discharged, it must be replaced.
- To open the key fob cover, use a thin, firm and electrically non-conductive object at the point where the strap is attached.
- Before inserting a new battery, first press the key fob buttons or wait 30 seconds after removing the old battery.
- Insert the new power battery into the dedicated place. Observe the +/- polarity.
⚠ NOTICE:
Keep new and used batteries out of the reach of children. Do not swallow the battery, risk of chemical burns.
Maintenance:
- When cleaning the key fob body, use any product suitable for device maintenance.
- Do not use any substances containing alcohol, acetone, petrol or other active solvents to clean the key fob.
Disposal
Do not dispose of electrical appliances as unsorted municipal waste; use separate waste collection points. Contact your local authorities for current information on collection points. If electrical appliances are disposed of in landfills, hazardous substances can leak into the groundwater and enter the food chain, damaging your health.
Warranty
- The manufacturer warrants that, under normal use and operation, the device specified will be free from any defects in material and workmanship for a period of three years (excluding batteries) from the date of sale. The manufacturer's obligation under this warranty is limited to the repair or replacement of the product or any of its parts which it finds defective in material or workmanship, free of charge, after it has been sent together with proof of the date of purchase and with postage prepaid to the address of the service centre: SAFE HOME europe s.r.o., Čechova 1005/4, 750 02 Přerov, Czech Republic.
- This warranty becomes void if the product has been damaged, altered, misused, modified after purchase, or if it has ceased to function as a result of poor maintenance or incorrect placement.
- Any implied warranties arising from this sale, including but not limited to implied warranties of description, merchantability and fitness for a particular purpose, are limited to the duration of this warranty.
- Under no circumstances shall the manufacturer or any of its parent, affiliated companies, or our sales representative or distributor be liable for loss of functionality of this product, nor for any indirect, special, incidental or consequential damage, or for costs or expenses incurred by the consumer or any other user of this product, whether due to breach of contract, negligence, strict liability in tort, or for other reasons.
- Neither the manufacturer nor any of its parent, subsidiary companies, or our sales representative or distributor shall be liable for any personal injury, property damage, or for any other special, indirect, incidental, or consequential damage arising out of the use of the product.
- This warranty does not affect your statutory rights.
- If the device does not work properly, we recommend contacting our technical support first. In most cases, technical problems can be resolved remotely.
- Current information regarding warranties, certificates, attestations, and other documents can also be found on our website: smart-safe.eu
- Technical support (Monday – Friday, 08:00 – 16:00): podpora@safe-home.eu